Friday, March 31, 2017

Brush removal & Tab Repair

Equipment: Lamb Dyer Motors

Smoke and sparks fly as you try running your newest repair job.  It’s time again for brush replacement.  Let's take a look at how to remove the dryer brushes without damaging field wires and also what to do when damage occurs.   

The first step of brush removal seems obvious, to remove the two clamp screws, but hold off on that for a moment.   Take notice, there is a field wire that is plugged into the front of the brush.  The actual first step is to take a slotted screw driver, slide it between the field wire tab and the plastic part of the brush, and start to gently leverage the tab away from the brush (see picture).  You will only be able to get it started as you will run out of space.  Now is the time to remove the brush clamp and its two screws.  From here you may slightly lift the brush and further coax the field tab out of the brush.  

Note that sometimes these can be real pain to remove.   I will occasionally take a chisel, lay it flat on the brush plastic, and carefully tap it to crack the brush plastic for easy removal of the field tab. 

The Accident: Repairing a Broken Field Tab


If the field tab does break off, do not panic (see illustration A for a good field tab and B for a broken one)!  There is a solution, it just takes a little doing.  


First, you will snip off the piece of the crimp that is often left on the field wire.  Then remove a quarter inch of the heat wrap.   Do not miss this next step: you must scrape the quarter inch of exposed wire and remove the laminate coating, as it is continuity resistant (see illustration D for a scraped wire, shiny, and E for an wire with the coating on it, dull). 


Next you will need a replacement Brush Clips (see illustration C) that you can purchase through The Edge Pro.   You will place the crimp of the new clip over your scraped wire and crimp down.   You have solved the problem and are now ready to install your new brush set!

~Ronnie

The Edge Pro
(515) 963-1990
theedgepro.com


Tuesday, March 14, 2017

An Introduction to the CS-201-2017 Low AMP Machine

Nebraska Blades is proud to release the NEW CS-201-2017 Clipper Blade Sharpening Machine as of March 1, 2017

Why Update?
For over 16 years the CS-101-2000 Clipper BladeSharpening Machine had arguably been one of the best on the market but a lot can change within an industry in that amount of time. When Jason, owner of The Edge Pro, acquired the Nebraska Blades company in February of 2016 he knew it was time to make some needed modifications and upgrades to the Classic CS-101-2000 Machine.

Jason, having been a distributor for Nebraska Blades for many years prior to becoming the new owner was completely aware of the CS-101-2000’s success and shortcomings. Jason had spoken with many customers over the years about how the machine was not ideal for mobile units but it could work with a little effort.

Back in 2014 Jason had also acquired Huff’s Wholesale and the rights to the Extreme Kut Clipper Blade Sharpening Machine. While that machine never saw the market again due to complications with the manufacturing process, Jason knew that it had some valuable design features he wanted to combine with the CS-101.

Immediately following the acquisition of Nebraska Blades Jason started drawing up plans for a new and improved clipper blade sharpening machine that would enable customers to thrive in their shops and in their mobile units.

What’s New?
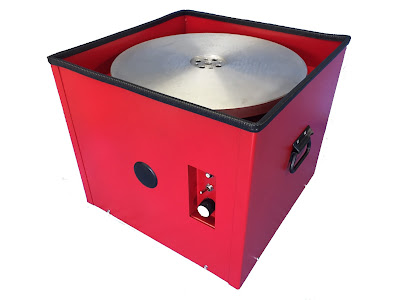
The first and most imposing step was to eliminate that pesky 34 AMP draw on startup! After quite a bit of research Jason discovered he could do away with the current motor and replace it with a more powerful three phase motor and a WEG VFD controller. Switching motors and adding a VFD gave the machine some handy new features, one of them being a motor brake to replace the old hand brake.
Secondly, the new machine has a variable speed control knob allowing you to sharpen from a max of 1750 RPMs down to 50% speed (around 875 RPMs but not exactly). Thirdly, upon request, the new machine can be reversed optimizing the machine for those sharpeners who are left handed. Fourth, but not least, the initial startup AMP draw of 34 has be dropped to somewhere between 3 to 6 AMPs!

Upon much contemplation, the decision was made to modify the housing cabinet of the machine. The first modification to note was to bring the outside edge of the cabinet up a little bit higher to cut down on the amount of grit the wheel throws at the sharpener. This keeps everyone and the sharpening space a little cleaner. Next, Jason evaluated that sometimes-annoying toggle switch that sticks out and decided to make all the switches and knobs recessed into the side of the machine.

What About My Old Machine?
Jason knew when the machine was released we would have customers who will want to upgrade their Classic CS-101-2000 Clipper Blade Sharpening Machines to include the technology and features of the New CS-201-2017 machine. We have made a conversion kit available as an affordable alternative to buying a whole new machine.

For only $1300 the kit includes the new motor, the VFD power inverter, the recessed switch housing and switches, mounting brackets, layout templates and instructions.

While all of this may sound complicated, we have worked very hard to make this a simple conversion for our customers and as painless as possible. While we tried to keep the process simple, there is some effort and assembly required but we will be your resource through the process.

What’s The Damage?
The upgrades from the CS-101-2000 to the new CS-210-2017 are extremely valuable to any sharpener. Unfortunately, the added hardware to the machine pushed the price up slightly. Having said that it is worth noting that the price on the Classic CS-101-2000, prior to 2017, had stayed the same since 2000 (if you are curious what that should cost with 17 years of inflation it would be around $2200).

Jason wanted to keep the CS-201-2017 Low AMP machine as affordable as possible but the price could not stay the same. The new CS-201 Low AMP Clipper Blade Sharpening Machine will start at $1995 with a 14” diameter rolled aluminum plate and $2195 with a 16” diameter cast aluminum plate.

What If I’m Happy With The Old One?
The plan is to continue selling the Classic CS-101-2000 as the perfect beginner machine. It is called a “101” because it is an entry level machine and is bare bones and user friendly. The new Low AMP machine is called a “201” because there is a little more to it than the classic machine.

The CS-101-2000 will be available online and in our catalogs for those customers who are content with it and in fact, the updated cabinet features will even start showing up on it as well.

It is important to note that in 17 years the world has changed and inflation has caused even fast food restaurants to remove beloved dollar menus. We still want the CS-101-2000 to be affordable for those starting out in the industry or simply looking to have a backup but there was no getting around the fact that pricing needed to be adjusted. The Classic CS-101-2000 Clipper Blade Sharpening Machine will start at $1695 with a 14” diameter rolled aluminum plate and $1895 with a 16” diameter cast aluminum plate. This new pricing will go in to effect as of April 1, 2017.

What Now?
The New CS-201 Low AMP Machine became available as of March 1, and we are happy to answer any questions you may have.

New Nebraska Blades catalogs are also now available via email upon request or snail mail for a small postage fee.

Keep us in mind. We want to continue to be a resource for your company and to see it continue to grow and be successful in the industry.

Nebraska Blades
The Edge Pro
1163 SW Ordnance RD
Ankeny, IA 50023

Phone: 866-963-1990
Fax: 515-964-0616

NebraskaBlades.com

TheEdgePro.com


Thursday, February 23, 2017

AG Housings Fix

Clipper: Andis Model AG & BG

Symptoms:
Runs intermittently
Speeds up and slows down
Cuts out

This issue has been a real stumper for me!  I would usually be looking for shorts in the cord, a bad armature, or faulty switches when this issue arises.    Even when all of these tests good, I often will still get continuing complaints of the same symptom from the consumer. 

It can often be observed that these switches are touchy.  If you bump the switch they will shut off or slow down to the first speed while still in the two speed position.  In the past, I have always just replaced the switch when this happens.  This has yielded mixed results.

“If the switch is cutting out or jumping speeds just put in a new switch!”  ~the frustrated repairman


This was my only solution until recently.     After continued frustration, a more thorough investigation brought on a new discovery!  

Discovery: There is a mechanism molded into the top housing and switch actuator of the clipper! 

This is designed to help with this specific problem.   It consists of notches on the inside of the housing and a flapper on the actuator.  They function together to keep the switch in the right place.  As the clipper’s life progresses, wear will start to diminish the function of these two pieces.  This wear starts allowing the switch to move outside of its designed range of motion.  This is when the symptoms start showing up.  

So next time this happens, try a new top housing and actuator before you throw a spendy switch in the clipper. This new technique has solved many of our recent repairs without a hitch!

~Ronnie


The Edge Pro
(515) 963-1990

theedgepro.com

Thursday, February 16, 2017

Oster Heat Trick

Clipper:  Oster A5 & 76 Styles

Symptoms: Internal parts will not come out

Are you frustrated by trying to get armatures and fields out of OsterA5 and Classic 76 Clippers? Are you tired of breaking housings, brushes, ruining fans, and cracking housing?  Then read on because I have a simple fix for you! 

“I’ll just grab onto the back of the motor and give it the old heave-ho!”  ~frustrated repairman

Remember, when working on these clippers there are several fragile parts. Do not resort to using your brawn.  I know it is tempting but I’ve tried about every way to pull out those parts without avail.  All you are going to do is break parts.  In this case, we want to use our brains instead of all that brawn.   First off make sure you have removed these parts:


Think back to science class, remember how different substances will expand when introduced to heat?  Plastic Oster housings are the practical application of this science class.  Next time you get one of those stuck housings, try putting it in a toaster oven (or regular oven for that matter) for 250 degrees and about 5 minutes.  Use a hot pad and do not try it in the microwave!  After 5 minutes the field and armature will literally fall out of the housing! 

Reverse these steps if you cannot get the armature and field to go back into the housing.  Hopefully this easy tip will help save you a headache!

Bonus tip: When removing your snap ring, put a hose clamp on the back of the housing to prevent the housing from breaking in case you slip with the snap ring pliers

~ Ronnie

The Edge Pro
(515) 963-1990

Thursday, February 9, 2017

Volt Hinge


Clipper: Oster Volt & Heiniger Saphir

Symptoms: Hinge/ latch will not take blade

Not too long ago a new clipper came on the market, and with it comes another repair trick you will need to learn. The Heiniger Saphir, also marketed as the Oster Volt, is the clipper in question for today’s article.

“I keep putting on volt hinges and none of them work!” – the frustrated repairman

In this case our friend, the frustrated repairman, is correct!  Brand new volt hinges will not work.   That’s right folks, they will not work.  Before you panic though, be rest assured. This one is a simple fix and just takes a little “know how.” 


These hinge springs do not come preloaded, and before they will work you must load it.  Some of you might remember doing this on older model Osters (say pre 2000 era). There is a small triangular piece on the bottom back of the hinge (see figure #1), and this is the trouble maker!  It prevents the spring from being able to move into its correct position. 


 All you have to do is gently guide the springs around this triangle piece so that they are now on the bottom of the hinge and can freely move forward (see figure #2 for finished position).  That’s all! You’ve solved the problem! Install the new hinge, and it will work as designed!

~ Ronnie


The Edge Pro
(515) 963-1990

Thursday, February 2, 2017

AGC Switches
Clipper: 
Andis AGC & Ultra Edge

Symptoms:
-Clipper suddenly quits
-Smells burnt
-Gets really hot
-Switch is bad

If you have not been in the following situation before, count yourself blessed and pay attention to the following.  In your repairs, you will, at some point, come across an Andis AGC that has a bad switch. Don’t be too quick to install a new switch!

“Andis must have defective switches because they all go up in smoke when I install them.”
~the frustrated repairman


Usually when the switch goes bad on an AGC Clipper, it is in the resister (see picture above).  Many times this resister burning up is not because of a faulty switch, but rather it is a side effect of a greater issue. If you just slap in a new switch, it will often go up in a puff of smoke. If you want to be sure you do not fall victim to this same frustration, then you will need to know is what the real problem is.

Here is a trick to help you identify the problem: Take a pair of insulated pliers and bridge across the resister to “jump start the motor.” Please be careful not to touch anything but the insulated handles to avoid shock. Once you have the clipper running, listen to the motor. If it is running nice and smoothly, most likely you just have a bad switch. If it is running really roughly, you either have a bad armature or a foreign substance (such as oil) on the armature. In this case, you must test the armature and clean it before installing your new switch. Also, if you discover clippers with oil inside them, a thorough cleaning can prevent such switch fails.  Hopefully this can keep your switches in clippers and out of the trash!  

~Ronnie

The Edge Pro
(515) 963-1990


See our video on testing armatures: 


For more videos you might find helpful visit our YouTube channels:

https://www.youtube.com/user/Jasonedgepro

and 

https://www.youtube.com/user/nebraskablades


Monday, January 23, 2017

Missing Switch Nuts

Clipper: Oster 76 & A5 styles w/ toggle switch

Symptoms:
  •          The clipper does not run
  •          Runs intermittently
  •          Acts like a cord short but cannot be manipulated by pulling cord


“You don’t need the nut on the back of the clipper; it doesn’t do anything.” -the frustrated repairman

In our repairs, we often see where someone has taken the nut off the switch.  This causes the switch wires to be the only thing holding the switch in place.  While the clipper may continue to work for the time being, it is a ticking time bomb before the switch wires have been stressed enough to short and break. 

Each and every time you turn the clipper on or off, you are stressing those wires when missing the nut. So when you pick up a clipper, please include checking to make sure the switch nut is in place in your visual inspection.  If it is not, then take the end cap off and gently lift up on the switch wires to see if they have broken loose inside the switch.  Replace the switch if the wires are broken, otherwise install a new switch nut and save your customer a headache!

~ Ronnie

Oster switch nuts and switches can be ordered from:

The Edge Pro
(515) 963-1990